Introduction
Please see the article “Build a Linux-based Infrastructure Solution Demonstration Series” for rationale, introduction and links to articles in this series.
In this article I am configuring a Virtual Box Machine Image and installing and configuring the CentOS 6.8 OS and the Virtual Box Guest Additions. At the end of the process there will be a Virtual Box Machine Image with CentOS 6.8 installed, snapshot taken and image ready for further work.
All future articles in this series will assume that the image created this way is the baseline for further work.
Host Assumptions
I assume that the demonstration image is built as a Virtual Box 5.x virtual machine image and that the Virtual Box Host environment is Windows 7. This is not a hard requirement but merely an explanation of the Windows’isms which necessarily creep into this document, particularly when it comes to downloading distribution packages prior to image creation.
I assume that you installed the Oracle VirtualBox software on your chosen host, Windows 7 in my case, and are in position to create Virtual Machine Image using the CentOS 6.8 iso as a starting point.
Download assumptions
I assume that the platform from which the image will be created is Windows 7 and that the Windows directory to which packages will be downloaded is
O:\DemoBuilding\Distros
If you are working your way through this series and use either a different host OS or a different download file location then make appropriate adjustments.
Downloading Software Packages
| All packages which I am using are, as far as I am aware, free to download. It is your responsibility to ensure that you have the right to download and use the software which I am discussing in this document. |
Instructions for downloading, installing and configuring the software packages are provided when the package is first used.
Create and Configure baseline CentOS 6.8 VM Image
Download CentOS 6 Update 8
CentOS, https://wiki.centos.org, is a RedHat-like Linux distribution, available free of charge for any use as far as I can tell.
Download the CentOS 6.8 distribution from the nearest mirror, http://isoredirect.centos.org/centos/6/isos/x86_64/. For me this is http://centos.mirror.digitalpacific.com.au/6.8/isos/x86_64/.
I choose to download the two DVD iso images, CentOS-6.8-x86_64-bin-DVD1.iso and CentOS-6.8-x86_64-bin-DVD2.iso to my distribution packages directory
O:\DemoBuilding\Distros
http://centos.mirror.digitalpacific.com.au/6.8/isos/x86_64/CentOS-6.8-x86_64-bin-DVD1.iso
http://centos.mirror.digitalpacific.com.au/6.8/isos/x86_64/CentOS-6.8-x86_64-bin-DVD2.iso
Create and configure VM Image using the GUI (command line version next section)
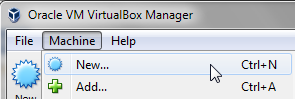
Start the VirtualBox Management UI – for me
"C:\Program Files\Oracle\VirtualBox\VirtualBox.exe"
Verify the location to which virtual machine files will be written and change as appropriate.
Choose Machine –> New
Name the image “demo”, configure the following settings:
Type: Linux
Version: Other Linux (64-bit) – I am assuming that you have a 64 bit machine if not adjust accordingly
Memory Size: 4096 MB – that should be sufficient for what I have in mind. Increase as needed.
Check “Create a Virtual Hard Disk Now”
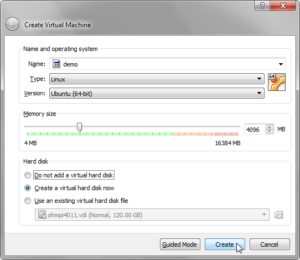
Click Create
Define name and location of the new hard disk – I prefer to keep all my VM files in the same place, which will happen if I correctly configure the location to which the files will go to by default.
Complete the dialogue box as follows:
File location: name – this assumes that the default location for the virtual disk file is used
File Size: 120MB
Check “VDI”
Check “Dynamically Allocated”
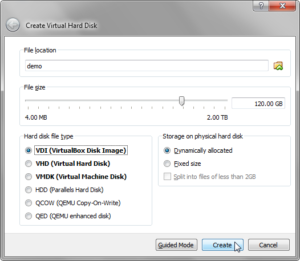
Click Create
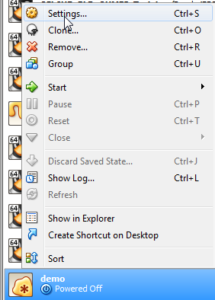
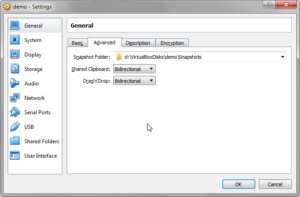
Right-click the name of the new Virtual Box machine and choose Settings
In “General”–>”Advanced” change “Shared Clipboard” and “Drag and Drop” to “bidirectional”
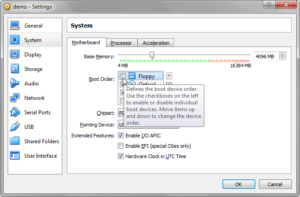
System–>Motherboard–>Boot Order: Uncheck Floppy
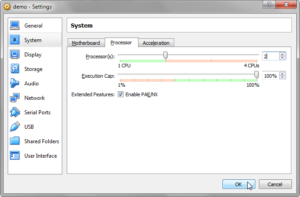
System–>Processor–>Processors: set a 1 less than the number of processors on your machine or some other number less than the total number of processors, possibly with the execution cap of less than 100% if you set this to the number of processors.
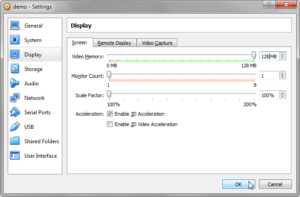
Display–>Screen: set Video Memory to 128MB and enable 3D acceleration
Storage –> Storage –> Controller: IDE –> demo.vdi: Check solid state drive if your vdi file is on a solid state drive (highly recommended for performance of your VM)
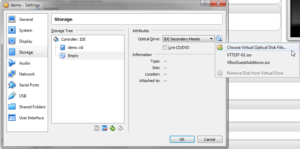
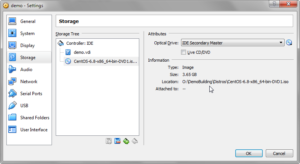
Storage –> Storage –> Controller: IDE –> Empty –> Optical Drive: select Choose Virtual Optical Drive File…, then navigate to the location of the CentOS 6.8 DVD 1 iso and select it: O:\DemoBuilding\Distros\CentOS-6.8-x86_64-bin-DVD1.iso
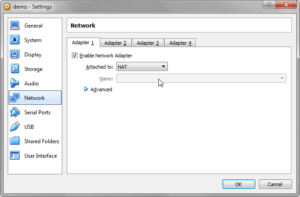
Network –> Adapter 1: Confirm that you have NAT network selected and if not select it. We want to be able to update the image or get missing packages over the Internet
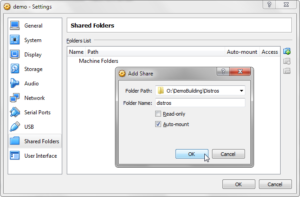
Shared Folders –> Shared Folders –> Folder List: click Add new Shared Folder (+) icon, navigate to the location to which you downloaded the CentOS iso distribution disks and choose that folder. Check the Auto-mount checkbox and click OK
User Interface –> Check “Show at top of screen”
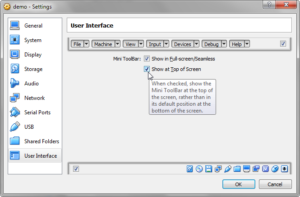
Click OK to finish configuration
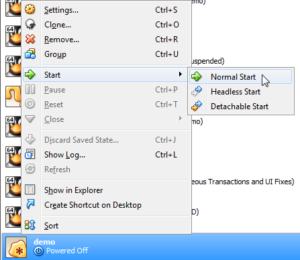
Boot the VM with the CentOS DVD 1 iso in the optical drive by selecting the new “demo” image in the Virtual Box Manager tree and clicking “Start”, or following the right-click menu selections over the “demo” image
Create and configure VM using command line (instead of the GUI – above)
If you configured the VM using the GUI following the steps in the previous section then you don’t need to execute the command in this section. If you skipped the previous section because you want to configure the VM using the command line, carry on.
I used some of the material in http://superuser.com/questions/741734/virtualbox-how-can-i-add-mount-a-iso-image-file-from-command-line
With the VM not started, in the DOS Box / CMD window, execute the following commands:
set VBM="C:\Program Files\Oracle\VirtualBox\VBoxManage.exe"

@create and register bare VM
 %VBM% createvm --name "demo" --ostype "RedHat_64" --register

@rem Execute the following to determine where the files are going and make sure to use that directory path in creating thwe disk
 %VBM% showvminfo "demo" | find "Config file:"

@rem set the disk file location and name
 set diskFile=d:\VirtualBoxDisks\demo\demo.vdi

%VBM% storagectl "demo" --name IDE --add ide --controller PIIX4 --portcount 2 --bootable on
 %VBM% createhd --filename %diskFile% --size 120000
 %VBM% storageattach "demo" --storagectl "IDE" --port 0 --device 0 --type hdd --medium %diskFile%

%VBM% modifyvm "demo" --clipboard bidirectional
 %VBM% modifyvm "demo" --boot1 dvd
 %VBM% modifyvm "demo" --boot2 disk
 %VBM% modifyvm "demo" --boot3 none
 %VBM% modifyvm "demo" --boot4 none
 %VBM% modifyvm "demo" --cpus 3
 %VBM% modifyvm "demo" --cpuexecutioncap 100
 %VBM% modifyvm "demo" --memory 4096
 %VBM% modifyvm "demo" --vram 128
 %VBM% modifyvm "demo" --accelerate3d on
 %VBM% modifyvm "demo" --rtcuseutc on
 %VBM% modifyvm "demo" --paravirtprovider default
 %VBM% modifyvm "demo" --mouse ps2
 %VBM% modifyvm "demo" --usb on
 %VBM% modifyvm "demo" --usbehci on
 %VBM% modifyvm "demo" --nic1 nat
 %VBM% modifyvm "demo" --nicspeed1 10000000
 %VBM% modifyvm "demo" --macaddress1 auto
 %VBM% sharedfolder add "demo" --name "distros" --hostpath "O:\DemoBuilding\Distros" --automount
 %VBM% setextradata "demo" "GUI/MiniToolBarAlignment" "Top"

@rem mount the iso image for installation
 %VBM% storageattach "demo" --storagectl IDE --port 1 --device 0 --type dvddrive --medium "O:\DemoBuilding\Distros\CentOS-6.8-x86_64-bin-DVD1.iso"
Boot the VM with the CentOS DVD 1 iso in the optical drive
%VBM% startvm "demo"
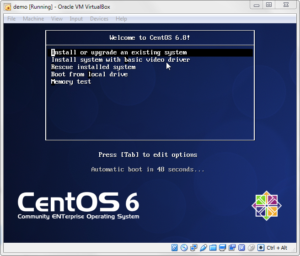
Install CentOS 6.8
When you bot the VM after it is created the installation process will start. You will need to have the 1st iso mounted, which it will be if you followed the steps above. If you choose the options I chose below you will need to mount the 2nd iso to mount as well so make sure you have both before you start.
Make sure that the “Install or upgrade an existing system” is selected and press “Enter”
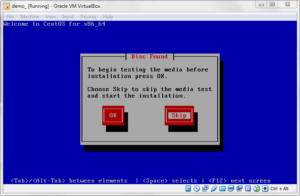
Skip media testing
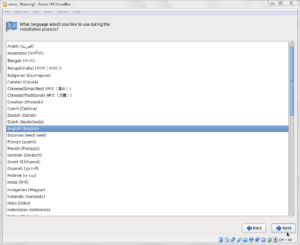
Choose “English (English)” language (if you choose another language you will need to make such changes in the instructions as will be necessary to compensate for the fact that this guide is written in English for an English language OS)
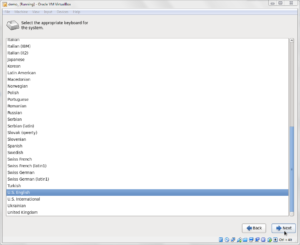
Choose US English keyboard
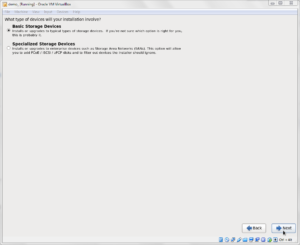
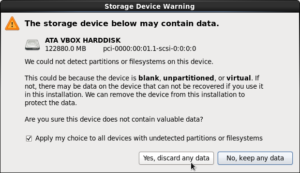
Choose Basic Storage Device
Click “Yes, discard any data”
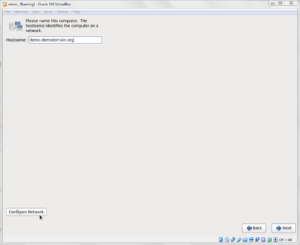
Enter “demo.demodomain.org” into the “Host” box and click the “Configure Network” button
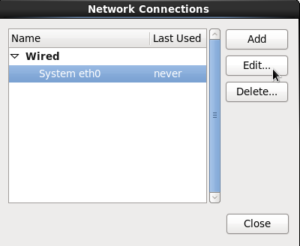
Choose “System eth0” and click Edit
Check “Connect Automatically” and click “Apply”
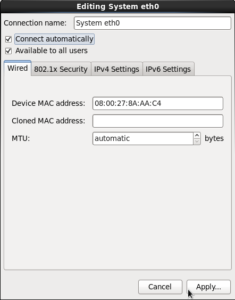
Click Close
Choose your timezone – Mine is Sydney/Australia
Set root password to welcome1 (or whatever you prefer and will remember)
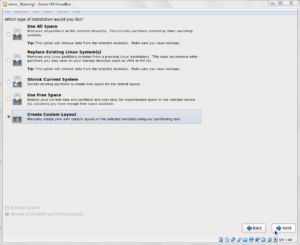
Choose “Create custom layout”
Select “Hard Drives –> sda –> Free” node in the node tree and click “Create”
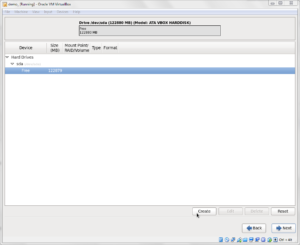
Select “Standard partition” and click “Create”
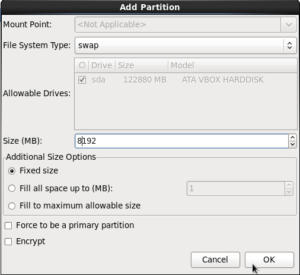
Change “File System Type” to “swap”
Set “Size (MB)” to 8192
Ensure “Fixed Size” is selected then click “OK”
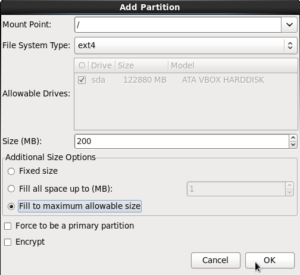
Select “Hard Drives –> sda –> Free” node in the node tree and click “Create”
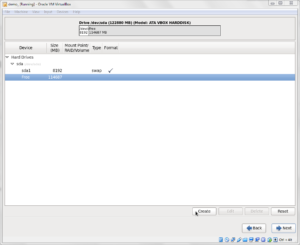
Select “Standard partition” and click “Create”
Enter “/” for “Mount Point”
Retain “File System Type” of “ext4”
Check “Fill to maximum allowable size” and Click “Create”
Click “Format”
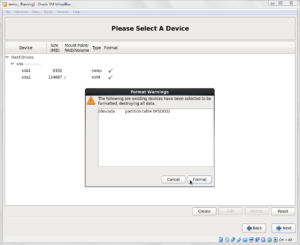
Click “Write changes to disk”
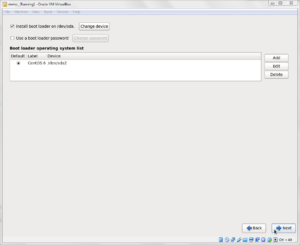
Accept “Install boot loader on /dev/sda”
Choose “Software Development Workstation”
Select “Customize Now”
Applications –>
Uncheck: “TeX Support” and “Technical Writing”
Select “Graphics Support Tools”, click “Optional Packages”, select “ImageMagick”, “Close”
Base System –>
Uncheck: Directory Client, Java Platform, Network File System Client, Performance Tools, Printing Client
Check: Compatibility Libraries
Databases –>
Check: MySQL Database Client, click “Optional Packages”, select MySQL Python, mysql-connector-java, mysql-connector-odbc, click “Close”
Check MySQL Database Server
Desktops –>
Check KDE Desktop (all checkboxes will be checked)
Select “Fonts”, click “Optional Packages”, uncheck all the fonts that you will not need, amd check “bitmap-lucida” and “bitmap-fixed”
Servers –> Check CIFS File Server
Virtualization –> uncheck all options
Installation will now proceed, with 1529 packages to be installed
Click Forward
Click Forward
Username: demo
Password: welcome1
Click Forward
Check date and time and click Forward
Click Finish
Log in as use demo/welcome1
Install Virtual Box Guest Additions
Pull down the “Devices” menu of the running Virtual Box Image and choose “Insert Guest Additions CD image…”
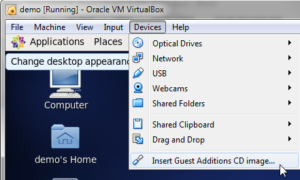
Click “OK” when the dialogue box opens
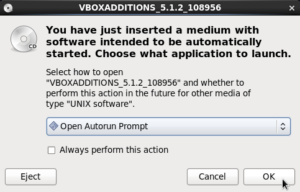
Click “Run”
Provide root password welcome1 and click “Authenticate”
Observe feedback in the terminal window the installer opens
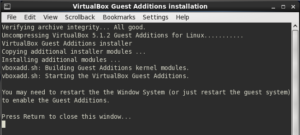
Press Return/Enter to close the window.
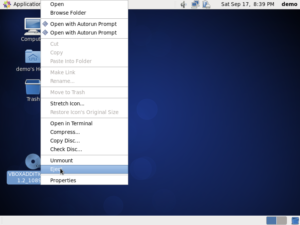
Right-click on the VBOXADDITIONS… icon on the Desktop and choose “Eject”
Reboot the image: System -> Shutdown -> Reboot
Shut down the image and snapshot
"C:\Program Files\Oracle\VirtualBox\VBoxManage.exe" snapshot "demo" take "v1.0.0 Baseline - CentOS 6.8 Installed" --description "v1.0.0 Baseline - CentOS 6.8 Installed"
Configure the VM Image for screen resolution and other things
Assume that the VBoxManage.exe is installed in a default location, that the host is a Windows host and that the name of the VM image is “demo”.
In a command / terminal window of the host machine, while the VM is running, execute the following (or similar command if your host is not Windows) to see what your Virtual Box configuration is.
"c:\Program Files\Oracle\VirtualBox\VBoxManage.exe" showvminfo "demo"
With the VM running execute the following (or similar command if your host is not Windows) to set non-standard video modes and memory pre-allocation.
"C:\Program Files\Oracle\VirtualBox\VBoxManage.exe" setextradata "demo" "CustomVideoMode1" "1440x900x32"
"C:\Program Files\Oracle\VirtualBox\VBoxManage.exe" setextradata "demo" "CustomVideoMode2" "1366x768x32"
"C:\Program Files\Oracle\VirtualBox\VBoxManage.exe" setextradata "demo" "CustomVideoMode2" "1920x1080x32"
"C:\Program Files\Oracle\VirtualBox\VBoxManage.exe" setextradata "demo" "CustomVideoMode2" "1720x1000x32"
"C:\Program Files\Oracle\VirtualBox\VBoxManage.exe" setextradata "demo" "CustomVideoMode2" "1600x836x32"
This too needs the VM to be running
"C:\Program Files\Oracle\VirtualBox\VBoxManage.exe" controlvm "demo" setvideomodehint 1440 900 32
"C:\Program Files\Oracle\VirtualBox\VBoxManage.exe" controlvm "demo" setvideomodehint 1366 768 32
"C:\Program Files\Oracle\VirtualBox\VBoxManage.exe" controlvm "demo" setvideomodehint 1920 1280 32
"C:\Program Files\Oracle\VirtualBox\VBoxManage.exe" controlvm "demo" setvideomodehint 1720 1000 32
"C:\Program Files\Oracle\VirtualBox\VBoxManage.exe" controlvm "demo" setvideomodehint 1600 836 32
"C:\Program Files\Oracle\VirtualBox\VBoxManage.exe" setextradata "demo" VBoxInternal/RamPreAlloc 1
Shut down the VM
With the VM shut down execute the following (or similar command if your host is not Windows) to set the speed of the NIC
"C:\Program Files\Oracle\VirtualBox\VBoxManage.exe" modifyvm "demo" --nicspeed1 10000000
Boot the VM
For working in “comfort”
"C:\Program Files\Oracle\VirtualBox\VBoxManage.exe" setextradata "demo" "CustomVideoMode2" "1600x836x32"
The one below needs VM running
"C:\Program Files\Oracle\VirtualBox\VBoxManage.exe" startvm "demo"
"C:\Program Files\Oracle\VirtualBox\VBoxManage.exe" controlvm "demo" setvideomodehint 1600 836 32Shut the image down and use the Virtual Box Manager to take a Snapshot of the image. Name the snapshot "v1.0.0 Installed CentOS 6.8 and Virtual Box Guest Additions"
Shut the image down and use the Virtual Box Manager to take a Snapshot of the image. Name the snapshot “v1.0.0 Installed CentOS 6.8 and Virtual Box Guest Additions”

This is it. The image is ready for further work.


