Introduction
Please see the article “Build a Linux-based Infrastructure Solution Demonstration Series” (https://blogs.czapski.id.au/2016/10/build-a-linux-based-infrastructure-solution-demonstration-series) for rationale, introduction and links to articles in this series.
Ordinarily I create a dynamic virtual disk with the potential to grow to perhaps 120Gb In size. Since the disk I ordinarily create is dynamic the host disk space it needs gets allocated as needed, thus the disk may never actually grow to the defined size.
There may be circumstances, for example if one needs to create a raw disk for import into 3rd party virtualisation platform, when the size of the disk must be reduced to conform to externally imposed constraints.
In this post I discuss how a virtual disk with a working installation can be reduced in size while remaining useable. This will be accomplished using the virtual disk which was built up in this series of articles.
Pre-Requisites
This article assumes that the Virtual Box Machine Image created in accordance with the instructions in the blog article to be found at https://blogs.czapski.id.au/2016/10/configure-virtual-box-virtual-machine-and-install-centos-6-8-base-image is available but it is expected that pretty much any VirtualBox Linux disk will do just as well.
The instructions should work in other RedHat 6-like OS’ and OS versions.
Discussion
Let’s assume that we need to shrink a virtual disk of a configured Virtual Box Virtual Machine. This disk will be partitioned, if you are using the disk image created in the series of articles of which this one is a part, into two partitions. The partitions are the swap partition, 8GB in size, at the beginning of the disk, and the data partition, occupying the rest of the disk.
Boot the demo image. log in, and execute the following command in a terminal window to see how the disk is partitioned:
lsblk
I see:
NAME   MAJ:MIN RM   SIZE RO TYPE MOUNTPOINT
sda      8:0    0 117.2G  0 disk
??sda1   8:1    0     8G  0 part [SWAP]
??sda2   8:2    0 109.2G  0 part /
sr0     11:0    1  1024M  0 rom
There is one disk device, sda, which has 117.2GB of useable space, which has two partitions – sda1 is a swap partition of 8GB and sda2 is a file system partition of 102.2GB.
Let’s find out how much of the file system partition is actually used:
df -h
I see:
Filesystem      Size  Used Avail Use% Mounted on
/dev/sda2       108G  5.8G   97G   6% /
tmpfs           1.9G   80K  1.9G   1% /dev/shm
Let’s say that we don’t expect to use more than another 20GB so we can see that if we shrink the partition to around 30GB we will have plenty of room for what we expect to be doing.
The process involves shrinking the source disk’s partition and cloning the disk with a smaller partition, then discarding the original disk and using the smaller disk in its place.
To accomplish the task we will go through the following steps:
- Export the VM to a .ova archive – this will cause any differencing disks / snapshots to be applied and will give us a complete source virtual disk in the archive – this will also serve as a backup if we have issues shrinking the disk
- Import the exported VM image to create a new VM – we need a VM to manipulate the source virtual disk so we will use the one created by the import
- Create a blank, 40GB Virtual Disk to use as target
- Attach the new blank disk to the new VM – this will give us access to both the source and the target disks – source to shrink and target to copy the shrunk partition to it
- Boot from GParted Live CD – this will give us access to the GParted tools and to the virtual disk which to shrink
- Shrink the source disk file system partition to 30GB
- Partition the target disk
- Copy source disk’s swap partition to the target disk
- Copy source disk’s file system partition to the target disk
- Reboot with the CentOS Install disk in the DVD drive to have access to system rescue facilities
- Fix the Grub Bootloader
- Reboot with just the target disk attached
Resources
The resources we need are the Centos install ISO, which we should have from our earlier work, http://centos.mirror.digitalpacific.com.au/6.8/isos/x86_64/CentOS-6.8-x86_64-bin-DVD1.iso and GParted ISO, from http://downloads.sourceforge.net/project/gparted/gparted-live-stable/0.27.0-1/gparted-live-0.27.0-1-i686.iso?r=http%3A%2F%2Fgparted.sourceforge.net%2F&ts=1482278033&use_mirror=internode
Assuming that you don’t have the ISOs, in a terminal widow, execute the following commands:
wget http://centos.mirror.digitalpacific.com.au/6.8/isos/x86_64/CentOS-6.8-x86_64-bin-DVD1.iso -O /media/sf_distros/CentOS-6.8-x86_64-bin-DVD1.iso

wget http://downloads.sourceforge.net/project/gparted/gparted-live-stable/0.27.0-1/gparted-live-0.27.0-1-i686.iso -O /media/sf_distros/gparted-live-0.27.0-1-i686.iso
Export Virtual Disk
Let’s find out how our “demo” Virtual Machine is configured (assuming our host is a Windows OS – adjust as required if your host is a Unix-like OS).
@rem see what the VM looks like
set VBM="C:\Program Files\Oracle\VirtualBox\VBoxManage.exe"
%VBM% showvminfo "demo"
I see
Name:            demo
Groups:          /
Guest OS:        Red Hat (64-bit)
UUID:            a9a4e4a6-77d3-4c7c-abb1-024291c8bbf4
Config file:     d:\VirtualBoxDisks\demo\demo.vbox
Snapshot folder: d:\VirtualBoxDisks\demo\Snapshots
Log folder:      d:\VirtualBoxDisks\demo\Logs
Hardware UUID:   a9a4e4a6-77d3-4c7c-abb1-024291c8bbf4
Memory size:     4096MB
Page Fusion:     off
VRAM size:       128MB
CPU exec cap:    100%
HPET:            off
Chipset:         piix3
Firmware:        BIOS
Number of CPUs:  3
PAE:             on
Long Mode:       on
Triple Fault Reset: off
APIC:            on
X2APIC:          on
CPUID Portability Level: 0
CPUID overrides: None
Boot menu mode:  message and menu
Boot Device (1): DVD
Boot Device (2): HardDisk
Boot Device (3): Not Assigned
Boot Device (4): Not Assigned
ACPI:            on
IOAPIC:          on
BIOS APIC mode:  APIC
Time offset:     0ms
RTC:             UTC
Hardw. virt.ext: on
Nested Paging:   on
Large Pages:     on
VT-x VPID:       on
VT-x unr. exec.: on
Paravirt. Provider: Default
Effective Paravirt. Provider: KVM
State:           running (since 2016-12-23T23:48:11.544000000)
Monitor count:   1
3D Acceleration: on
2D Video Acceleration: off
Teleporter Enabled: off
Teleporter Port: 0
Teleporter Address:
Teleporter Password:
Tracing Enabled: off
Allow Tracing to Access VM: off
Tracing Configuration:
Autostart Enabled: off
Autostart Delay: 0
Default Frontend:
Storage Controller Name (0):            IDE
Storage Controller Type (0):            PIIX4
Storage Controller Instance Number (0): 0
Storage Controller Max Port Count (0):  2
Storage Controller Port Count (0):      2
Storage Controller Bootable (0):        on
IDE (0, 0): d:\VirtualBoxDisks\demo\Snapshots\{c8e1a17f-6271-483f-870f-3a691a93a635}.vdi (UUID: c8e1a17f-6271-483f-870f-3a691a93a635)
IDE (1, 0): Empty
NIC 1:           MAC: 08002753AFFF, Attachment: NAT, Cable connected: on, Trace: off (file: none), Type: 82540EM, Reported speed: 10000 Mbps
, Boot priority: 0, Promisc Policy: deny, Bandwidth group: none
NIC 1 Settings:  MTU: 0, Socket (send: 64, receive: 64), TCP Window (send:64, receive: 64)
NIC 2:           disabled
NIC 3:           disabled
NIC 4:           disabled
NIC 5:           disabled
NIC 6:           disabled
NIC 7:           disabled
NIC 8:           disabled
Pointing Device: PS/2 Mouse
Keyboard Device: PS/2 Keyboard
UART 1:          disabled
UART 2:          disabled
UART 3:          disabled
UART 4:          disabled
LPT 1:           disabled
LPT 2:           disabled
Audio:           enabled (Driver: DSOUND, Controller: AC97, Codec: STAC9700)
Clipboard Mode:  Bidirectional
Drag and drop Mode: disabled
Session name:    GUI/Qt
Video mode:      1600x900x32 at 0,0 enabled
VRDE:            disabled
USB:             enabled
EHCI:            enabled
XHCI:            disabled

USB Device Filters:
<none>

Available remote USB devices:
<none>

Currently Attached USB Devices:
<none>

Bandwidth groups:  <none>

Shared folders:
Name: 'distros', Host path: 'O:\DemoBuilding\Distros' (machine mapping), writable
VRDE Connection:    not active
Clients so far:     0

Video capturing:    not active
Capture screens:    0
Capture file:       d:\VirtualBoxDisks\demo\demo.webm
Capture dimensions: 1024x768
Capture rate:       512 kbps
Capture FPS:        25

Guest:

Configured memory balloon size:      0 MB
OS type:                             Linux26_64
Additions run level:                 2
Additions version:                   5.1.8 r111374

Guest Facilities:

Facility "VirtualBox Base Driver": active/running (last update: 2016/12/23 23:48:22 UTC)
Facility "VirtualBox System Service": active/running (last update: 2016/12/23 23:48:31 UTC)
Facility "Seamless Mode": active/running (last update: 2016/12/23 23:48:22 UTC)
Facility "Graphics Mode": active/running (last update: 2016/12/23 23:48:22 UTC)

Snapshots:
   Name: v1.0.0 Baseline - CentOS 6.8 Installed (UUID: dedfb09a-965b-42e5-898e-e2d207dca628)
   Description:
v1.0.0 Baseline - CentOS 6.8 Installed
      Name: v1.0.8 Update DHCP address in /etc/hosts at boot (UUID: 6473898e-c9e4-4d60-8c5e-5e16187e5125)
         Name: v1.0.9 Script adding a new gnome-terminal profile (UUID: 228ef39e-81ac-49ff-a5ee-7be9977899b7)
            Name: v1.1.0 Installed CentOS 6.8 and configured root environment (UUID: 4ddc0470-b586-44ad-908e-2a7af518de43)
               Name: Snapshot 1 (UUID: 5e5463f0-7fbb-472d-8473-bca3924e19f7)
               Name: v1.1.1 Script creating a new demo user (UUID: 1089b3c9-8e93-4d1c-a480-0eb745275915) *
Note that the disk has a bunch of snapshots so we need to export the machine to “flatten” them out into a complete virtual disk in a single file.
Make sure the source virtual machine is shut down.
Assuming that we use the directory on Windows which we use for software distributions, let’s create a directory for the export and export the virtual machine:
@rem create output directory and export disk image
mkdir O:\DemoBuilding\Distros\demo_export
set VBM="C:\Program Files\Oracle\VirtualBox\VBoxManage.exe"
%VBM% export "demo" --output O:\DemoBuilding\Distros\demo_export\demo_export.ova --ovf20 --manifest --options manifest,nomacs
I see
0%...10%...20%...30%...40%...50%...60%...70%...80%...90%...100%
Successfully exported 1 machine(s).
Import the exported VM
Let’s find out how the Virtual Machine export looks like (assuming our host is a Windows OS – adjust as required if your host is a Unix-like OS).
@rem import ova as --dry-run to see what a real import would look like
set VBM="C:\Program Files\Oracle\VirtualBox\VBoxManage.exe"
%VBM% import O:\DemoBuilding\Distros\demo_export\demo_export.ova  --dry-run
I see
0%...10%...20%...30%...40%...50%...60%...70%...80%...90%...100%
Interpreting O:\DemoBuilding\Distros\demo_export\demo_export.ova...
OK.
Disks:
  vmdisk1       0       -1      http://www.vmware.com/interfaces/specifications/vmdk.html#streamOptimized demo_export-disk1.vmdk  -1
-1

Virtual system 0:
 0: Suggested OS type: "RedHat_64"
    (change with "--vsys 0 --ostype <type>"; use "list ostypes" to list all possible values)
 1: Suggested VM name "demo_1"
    (change with "--vsys 0 --vmname <name>")
 2: Number of CPUs: 3
    (change with "--vsys 0 --cpus <n>")
 3: Guest memory: 4096 MB
    (change with "--vsys 0 --memory <MB>")
 4: Sound card (appliance expects "", can change on import)
    (disable with "--vsys 0 --unit 4 --ignore")
 5: USB controller
    (disable with "--vsys 0 --unit 5 --ignore")
 6: Network adapter: orig NAT, config 3, extra slot=0;type=NAT
 7: CD-ROM
    (disable with "--vsys 0 --unit 7 --ignore")
 8: IDE controller, type PIIX4
    (disable with "--vsys 0 --unit 8 --ignore")
 9: IDE controller, type PIIX4
    (disable with "--vsys 0 --unit 9 --ignore")
10: Hard disk image: source image=demo_export-disk1.vmdk, target path=o:\VirtualBoxDisks\demo_1\demo_export-disk1.vmdk, controller=8;channel
=0
    (change target path with "--vsys 0 --unit 10 --disk path";
    disable with "--vsys 0 --unit 10 --ignore")
Note that the name the imported VM would be give would be demo_1. This is not what we want so we will tell import to change it to demo2. There are a bunch of other settings that can be changed during import. The Virtual Box User Manual provides information on these options.
Let’s import the VM with the new name.
set VBM="C:\Program Files\Oracle\VirtualBox\VBoxManage.exe"
%VBM% import O:\DemoBuilding\Distros\demo_export\demo_export.ova --vsys 0 --vmname "demo2" --description "Shrunk VM"
I see:
0%...10%...20%...30%...40%...50%...60%...70%...80%...90%...100%
Interpreting O:\DemoBuilding\Distros\demo_export\demo_export.ova...
OK.
Disks:
  vmdisk1       0       -1      http://www.vmware.com/interfaces/specifications/vmdk.html#streamOptimized       demo_export-disk1.vmdk  -1
-1

Virtual system 0:
 0: Suggested OS type: "RedHat_64"
    (change with "--vsys 0 --ostype <type>"; use "list ostypes" to list all possible values)
 1: VM name specified with --vmname: "demo2"
 2: Number of CPUs: 3
    (change with "--vsys 0 --cpus <n>")
 3: Guest memory: 4096 MB
    (change with "--vsys 0 --memory <MB>")
 4: Sound card (appliance expects "", can change on import)
    (disable with "--vsys 0 --unit 4 --ignore")
 5: USB controller
    (disable with "--vsys 0 --unit 5 --ignore")
 6: Network adapter: orig NAT, config 3, extra slot=0;type=NAT
 7: CD-ROM
    (disable with "--vsys 0 --unit 7 --ignore")
 8: IDE controller, type PIIX4
    (disable with "--vsys 0 --unit 8 --ignore")
 9: IDE controller, type PIIX4
    (disable with "--vsys 0 --unit 9 --ignore")
10: Hard disk image: source image=demo_export-disk1.vmdk, target path=o:\VirtualBoxDisks\demo_1\demo_export-disk1.vmdk, controller=8;channel
=0
    (change target path with "--vsys 0 --unit 10 --disk path";
    disable with "--vsys 0 --unit 10 --ignore")
0%...10%...20%...30%...40%...50%...60%...70%...80%...90%...100%
Successfully imported the appliance.
Let’s see what the new VM looks like
set VBM="C:\Program Files\Oracle\VirtualBox\VBoxManage.exe"
%VBM% showvminfo "demo2"
I see:
Name:            demo2
Groups:          /
Guest OS:        Red Hat (64-bit)
UUID:            76bd82ae-c445-41a8-88d9-1c75ef422b89
Config file:     o:\VirtualBoxDisks\demo2\demo2.vbox
Snapshot folder: o:\VirtualBoxDisks\demo2\Snapshots
Log folder:      o:\VirtualBoxDisks\demo2\Logs
Hardware UUID:   76bd82ae-c445-41a8-88d9-1c75ef422b89
Memory size:     4096MB
Page Fusion:     off
VRAM size:       128MB
CPU exec cap:    100%
HPET:            off
Chipset:         piix3
Firmware:        BIOS
Number of CPUs:  3
PAE:             on
Long Mode:       on
Triple Fault Reset: off
APIC:            on
X2APIC:          on
CPUID Portability Level: 0
CPUID overrides: None
Boot menu mode:  message and menu
Boot Device (1): DVD
Boot Device (2): HardDisk
Boot Device (3): Not Assigned
Boot Device (4): Not Assigned
ACPI:            on
IOAPIC:          on
BIOS APIC mode:  APIC
Time offset:     0ms
RTC:             UTC
Hardw. virt.ext: on
Nested Paging:   on
Large Pages:     on
VT-x VPID:       on
VT-x unr. exec.: on
Paravirt. Provider: Default
Effective Paravirt. Provider: KVM
State:           powered off (since 2016-12-24T00:27:28.000000000)
Monitor count:   1
3D Acceleration: on
2D Video Acceleration: off
Teleporter Enabled: off
Teleporter Port: 0
Teleporter Address:
Teleporter Password:
Tracing Enabled: off
Allow Tracing to Access VM: off
Tracing Configuration:
Autostart Enabled: off
Autostart Delay: 0
Default Frontend:
Storage Controller Name (0):            IDE
Storage Controller Type (0):            PIIX4
Storage Controller Instance Number (0): 0
Storage Controller Max Port Count (0):  2
Storage Controller Port Count (0):      2
Storage Controller Bootable (0):        on
IDE (0, 0): o:\VirtualBoxDisks\demo_1\demo_export-disk1.vmdk (UUID: ee418695-52a7-45ee-a8fe-c1ba5d9568f7)
IDE (1, 0): Empty
NIC 1:           MAC: 080027CB8540, Attachment: NAT, Cable connected: on, Trace: off (file: none), Type: 82540EM, Reported speed: 10000 Mbps
, Boot priority: 0, Promisc Policy: deny, Bandwidth group: none
NIC 1 Settings:  MTU: 0, Socket (send: 64, receive: 64), TCP Window (send:64, receive: 64)
NIC 2:           disabled
NIC 3:           disabled
NIC 4:           disabled
NIC 5:           disabled
NIC 6:           disabled
NIC 7:           disabled
NIC 8:           disabled
Pointing Device: PS/2 Mouse
Keyboard Device: PS/2 Keyboard
UART 1:          disabled
UART 2:          disabled
UART 3:          disabled
UART 4:          disabled
LPT 1:           disabled
LPT 2:           disabled
Audio:           enabled (Driver: DSOUND, Controller: AC97, Codec: STAC9700)
Clipboard Mode:  Bidirectional
Drag and drop Mode: disabled
VRDE:            disabled
USB:             enabled
EHCI:            enabled
XHCI:            disabled

USB Device Filters:
<none>

Bandwidth groups:  <none>

Shared folders:
Name: 'distros', Host path: 'O:\DemoBuilding\Distros' (machine mapping), writable

Video capturing:    not active
Capture screens:    0
Capture file:       o:\VirtualBoxDisks\demo2\demo2.webm
Capture dimensions: 1024x768
Capture rate:       512 kbps
Capture FPS:        25

Guest:

Configured memory balloon size:      0 MB
Let’s boot the machine, make sure that it works, and shut it down again:
@rem start the vm, inspect and shut down
set VBM="C:\Program Files\Oracle\VirtualBox\VBoxManage.exe"
%VBM% startvm "demo2" --type gui
Shrink and clone the source disk
Create a blank, 40GB Virtual Disk to use as target
We need a target disk to which to “clone” the resized source disk partition. Let’s create one.
@rem Create a virtual disk of the right size - 40GB - as target for data move
set VBM="C:\Program Files\Oracle\VirtualBox\VBoxManage.exe"
set diskFile=o:\VirtualBoxDisks\demo2\demo2-disk1.vmdk
%VBM% createmedium disk --filename %diskFile% --size 40000 --format VMDK --variant Standard
I see:
0%...10%...20%...30%...40%...50%...60%...70%...80%...90%...100%
Medium created. UUID: 6bf53b79-630d-41c7-8c98-cf54313d5d7f
Attach the new blank disk to the new VM
Let’s attach the new blank disk to the new VM. This will give us access to both the source and the target disks – source to shrink and target to copy the shrunk partition to.
set VBM="C:\Program Files\Oracle\VirtualBox\VBoxManage.exe"
set diskFile=o:\VirtualBoxDisks\demo2\demo2-disk1.vmdk
%VBM% storageattach "demo2" --storagectl "IDE" --port 0 --device 1 --type hdd --medium hdd --medium %diskFile%
Let’s see what this did:
set VBM="C:\Program Files\Oracle\VirtualBox\VBoxManage.exe"
%VBM% showvminfo "demo2" | find "IDE"
Storage Controller Name (0):            IDE
IDE (0, 0): o:\VirtualBoxDisks\demo_1\demo_export-disk1.vmdk (UUID: ee418695-52a7-45ee-a8fe-c1ba5d9568f7)
IDE (0, 1): o:\VirtualBoxDisks\demo2\demo2-disk1.vmdk (UUID: 6bf53b79-630d-41c7-8c98-cf54313d5d7f)
IDE (1, 0): Empty
Boot from GParted Live CD
We need to boot this VM from GParted Live CD. This will give us access to the GParted tools, to the virtual disk which to shrink and to the target disk to which to copy the source partition.
@rem attach GParted ISO
set VBM="C:\Program Files\Oracle\VirtualBox\VBoxManage.exe"
%VBM% storageattach "demo2" --storagectl "IDE" --port 1 --device 0 --type dvddrive --medium O:\DemoBuilding\Distros\gparted-live-0.27.0-1-i686.iso

set VBM="C:\Program Files\Oracle\VirtualBox\VBoxManage.exe"
%VBM% showvminfo "demo2" | find "IDE"
Storage Controller Name (0):            IDE
IDE (0, 0): o:\VirtualBoxDisks\demo_1\demo_export-disk1.vmdk (UUID: ee418695-52a7-45ee-a8fe-c1ba5d9568f7)
IDE (0, 1): o:\VirtualBoxDisks\demo2\demo2-disk1.vmdk (UUID: 6bf53b79-630d-41c7-8c98-cf54313d5d7f)
IDE (1, 0): O:\DemoBuilding\Distros\gparted-live-0.27.0-1-i686.iso (UUID: 7aeea2b7-f91e-43a3-8104-12b23dc4a0c0)
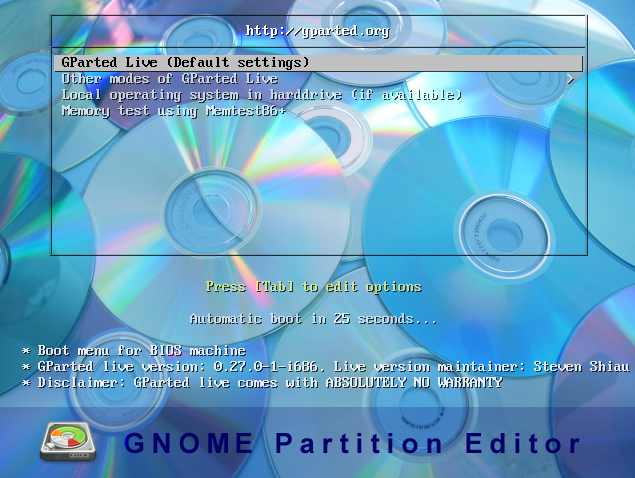
Boot from the GParted ISO
set VBM="C:\Program Files\Oracle\VirtualBox\VBoxManage.exe"
%VBM% startvm "demo2"
Press enter to choose GPated Live
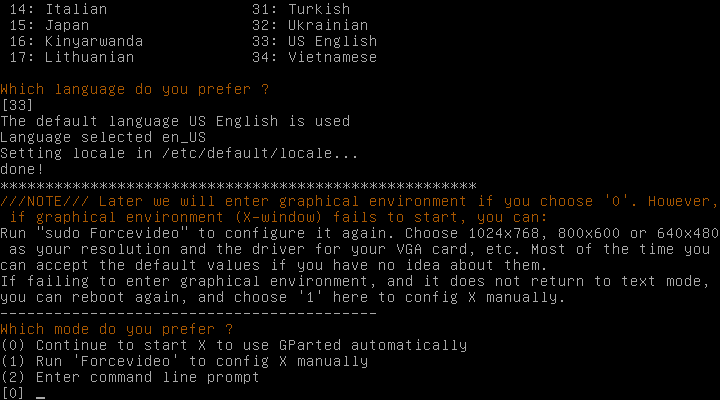
Choose OK to “Don’t touch keymap”.
Choose 33 (US English) for Language and choose 0 to continue to start X to use GParted automatically
GParted UI will appear. Proceed to the next section.
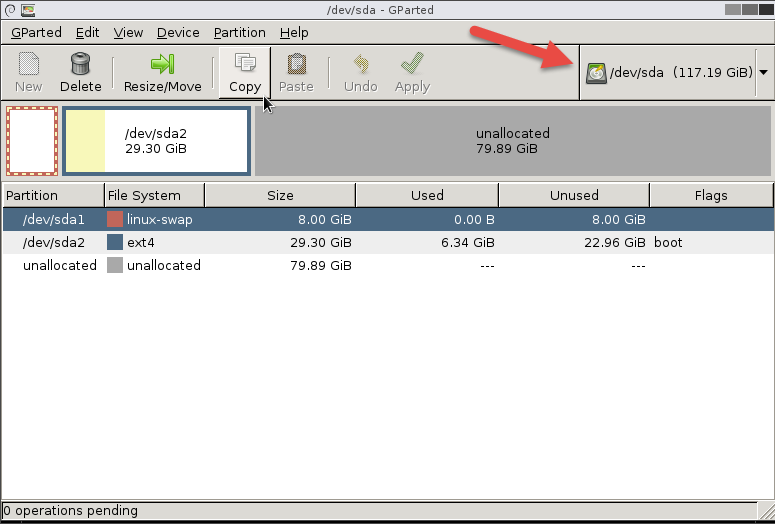
Shrink the source disk file system partition to 30GB
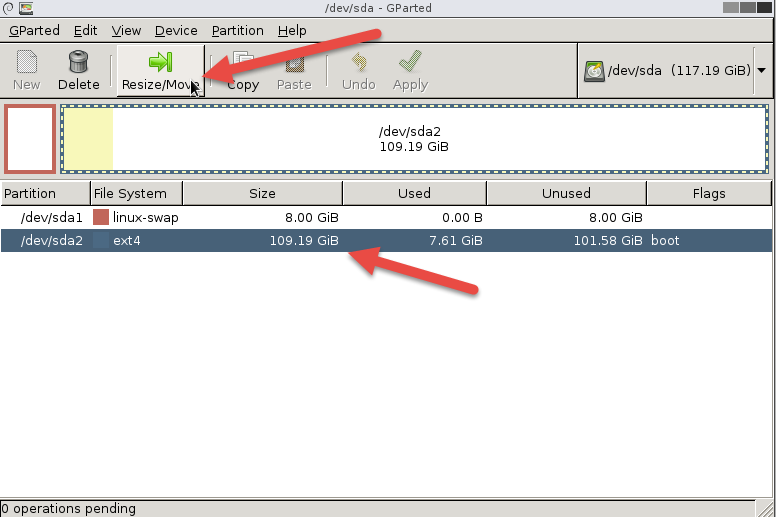
Make sure that the device being operated on is /dev/sda (top right corner of the GParted UI.
Click on the line describing device /dev/sda2 to select it, then click on the Resize/Move button.
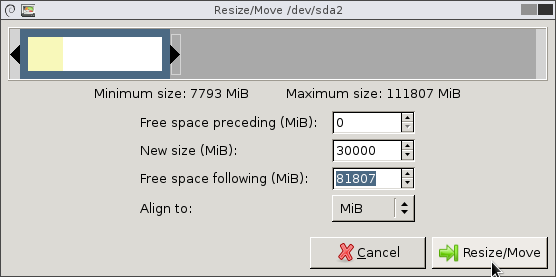
Enter 30000 as New Size in MiB, press Tab to advance to the next field and click Resize/Move button.
Click Apply and then Apply again to confirm and to start the process.

Review the feedback and click Close (assuming this worked, which it should)
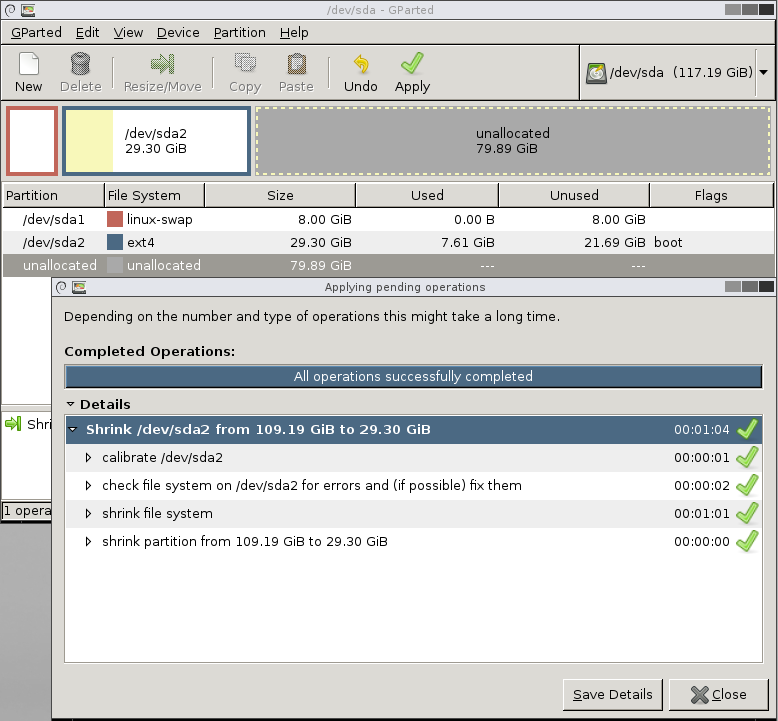
The source file system partition has be resized, leaving a considerable amount of disk unallocated. Follow next sections to clone the partitions to the new disk.
Partition the target disk
In this section we will partition the target disk, which has not yet been partitioned, so that it has the same number, type and layout of partitions as the source disk.
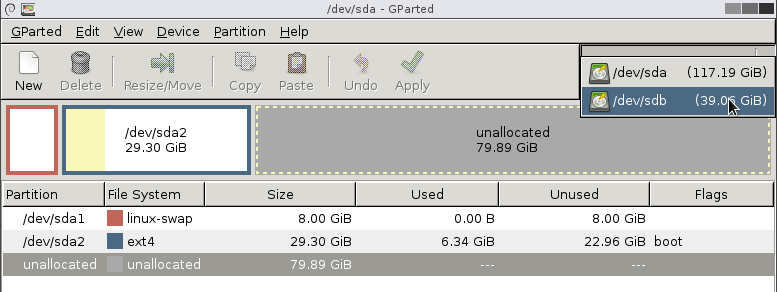
Pull down the devices drop down, top right corner, and choose the /dev/sdb device – the target disk.
Choose Device–>Create Partition Table …
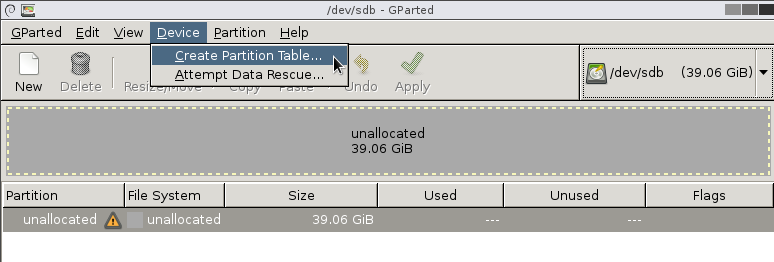
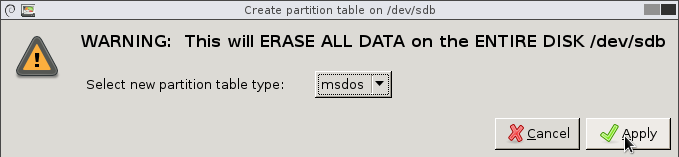
Choose MSDOS and click Apply
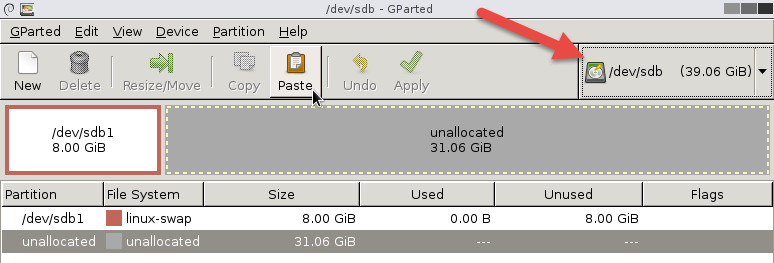
Copy source disk’s swap partition to the target disk
In this section we will copy the swap partition from the source disk, /dev/sda, to the target disk, /dev/sdb, which has a large amount of unallocated space.
Pull down the devices drop down, top right corner, and choose the /dev/sda device – the source disk.
Click the line with /dev/sda1 to select the swap partition and click Copy.
Pull down the devices drop down, top right corner, and choose the /dev/sdb device – the target disk, then click Paste.
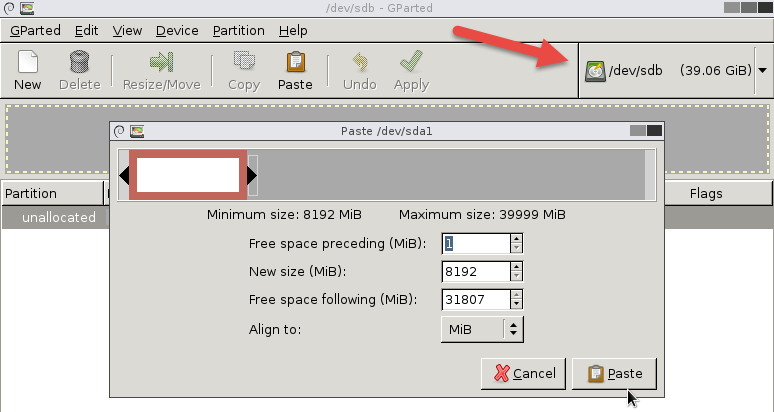
Leave the size and other aspects of the partition as they are and click the Paste button in the dialogue box.
Click the Apply button in the top button bar to execute the copy, and click Apply again.
Once the copy is completed and you inspected feedback information click the Close button to close the dialogue box
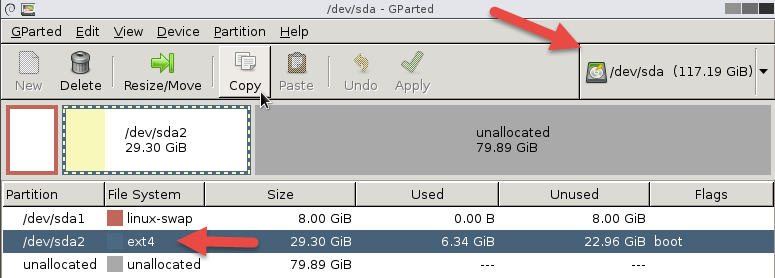
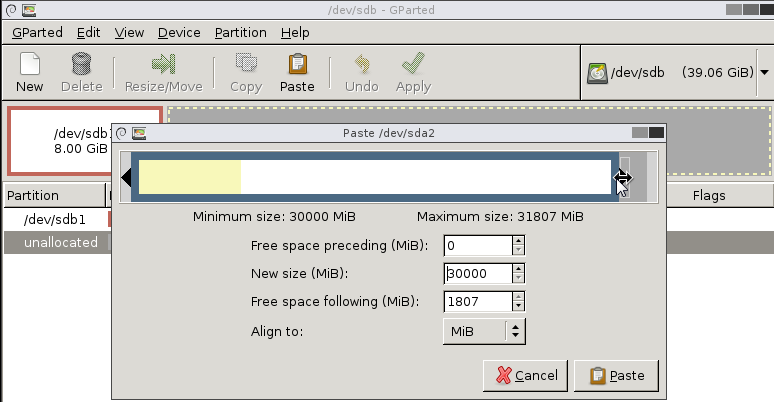
Copy source disk’s file system partition to the target disk
In this section we will copy file system partition from the source disk, /dev/sda, to the target disk, /dev/sdb, which has a large amount of unallocated space.
Pull down the devices drop down, top right corner, and choose the /dev/sda device – the source disk.
Click the line with /dev/sda2 to select the file system partition and click Copy.
Pull down the devices drop down, top right corner, and choose the /dev/sdb device – the target disk, then click Paste.
Adjust the size of the target partition using the slider until the Free space following is 0, then click the Paste button in the dialogue box
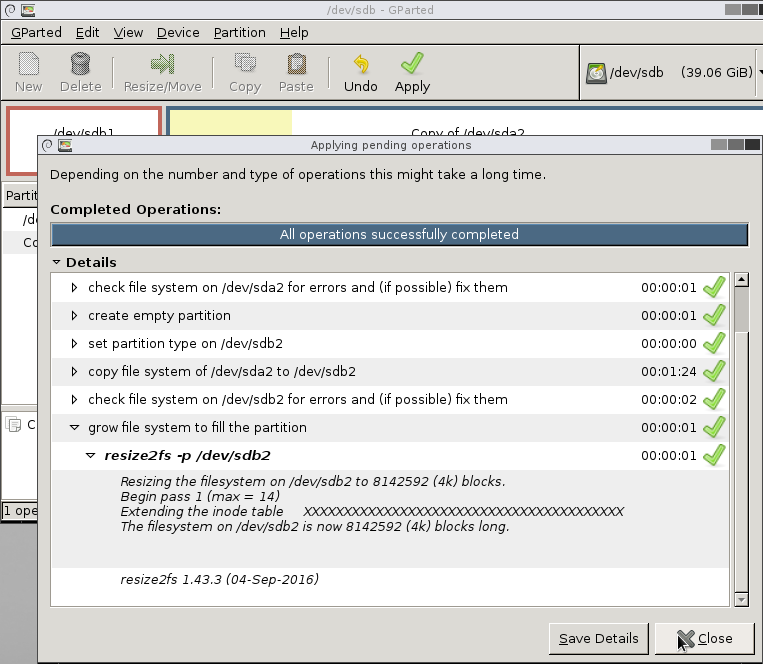
Click the Apply button in the top button bar to execute the action. This will take some time, which will vary with the size of the disk.
Once the copy is completed and you inspected feedback information click the Close button to close the dialogue box
Quit GParted.
Reboot with the CentOS Install disk in the DVD drive to have access to system rescue facilities
Double click the Close button, top left, on the desktop to eject the GParted ISO and shut down the image.
Detach the source drive.
set VBM="C:\Program Files\Oracle\VirtualBox\VBoxManage.exe"
set diskFile=o:\VirtualBoxDisks\demo2\demo2-disk1.vmdk
%VBM% storageattach "demo2" --storagectl "IDE" --port 0 --device 0 --type hdd --medium none
Attach CentOS Install ISO
@rem attach CentOS install ISO
set VBM="C:\Program Files\Oracle\VirtualBox\VBoxManage.exe"
%VBM% storageattach "demo2" --storagectl "IDE" --port 1 --device 0 --type dvddrive --medium O:\DemoBuilding\Distros\CentOS-6.8-x86_64-bin-DVD1.iso
%VBM% showvminfo "demo2" | find "IDE"
Storage Controller Name (0):            IDE
IDE (0, 1): o:\VirtualBoxDisks\demo2\demo2-disk1.vmdk (UUID: 6bf53b79-630d-41c7-8c98-cf54313d5d7f)
IDE (1, 0): O:\DemoBuilding\Distros\CentOS-6.8-x86_64-bin-DVD1.iso (UUID: c5ace9b9-edb3-4796-82c6-374c78991750)
Boot the image
@rem boot
%VBM% startvm "demo2"
Follow next section to fix the grub boot loader
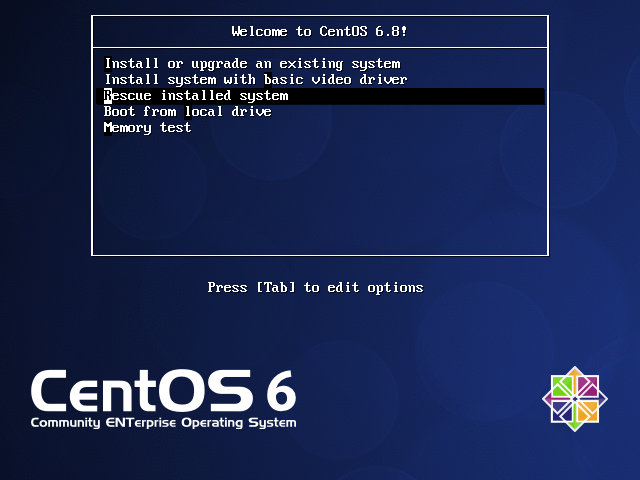
Fix the Grub Bootloader
Choose the Rescue Installed System option and press enter
Choose Language English and OK
Choose Keyboard Type us and OK
Choose Setup Networking NO
Choose Rescue Continue
Choose OK
Choose OK
Choose Start Shell
Execute the following commands
chroot /mnt/sysimage
/sbin/grub-install /dev/sda
exit
exit
Choose Reboot to get back to the install menu
In Virtual Box menu bar click the close button and choose Power off the machine to stop the VM

Reboot with just the target disk attached
Detach the installation ISO and boot the image
@rem attach CentOS install ISO
set VBM="C:\Program Files\Oracle\VirtualBox\VBoxManage.exe"
%VBM% storageattach "demo2" --storagectl "IDE" --port 1 --device 0 --type dvddrive --medium none
Boot the image
@rem boot
%VBM% startvm "demo2"
Verify partitioning and partition sizes by executing in a terminal window
lsblk
I see:
NAME   MAJ:MIN RM  SIZE RO TYPE MOUNTPOINT
sda      8:0    0 39.1G  0 disk
??sda1   8:1    0    8G  0 part [SWAP]
??sda2   8:2    0 31.1G  0 part /
And
df -h
I see:
Filesystem      Size  Used Avail Use% Mounted on
/dev/sda2        31G  5.8G   24G  20% /
tmpfs           1.9G   76K  1.9G   1% /dev/shm
Shut down the VM – it is ready to use


